分类目录归档:环境搭建

thinkcmf6.0的php环境配置

编译参数:
./configure –prefix=/home/system/php74 –enable-fpm –enable-mbstring –with-pdo-mysql –with-curl –enable-gd –with-freetype –with-pear –with-zlib

出现:Call to undefined function imagettftext()错误
我这边的情况是,第一次编译没加with-freetype,后续添加上还是不行,只能make clear,然后再configure,就好了,就当是编译时有缓存吧,不再花时间研究。

后台安装应用,无响应,不能安装,编译php时需要加上–with-zlib

gitlab-ce安装后的提示

[root@ecs-340051 opt]# cat /etc/gitlab/initial_root_password
# WARNING: This value is valid only in the following conditions
# 1. If provided manually (either via `GITLAB_ROOT_PASSWORD` environment variable or via `gitlab_rails[‘initial_root_password’]` setting in `gitlab.rb`, it was provided before database was seeded for the first time (usually, the first reconfigure run).
# 2. Password hasn’t been changed manually, either via UI or via command line.
#
# If the password shown here doesn’t work, you must reset the admin password following https://docs.gitlab.com/ee/security/reset_user_password.html#reset-your-root-password.

Password: XyQdnmCOPZfI+XutyMa40QPecLrKAQ1a456S8=

# NOTE: This file will be automatically deleted in the first reconfigure run after 24 hours.

翻译如下:

[root@ecs-340051 opt]# cat /etc/gitlab/initial_root_password

# WARNING:该值仅在以下条件下有效

# 1。如果手动提供(在’ gitlab.rb ‘文件中通过’ GITLAB_ROOT_PASSWORD ‘环境变量或’ gitlab_rails[‘initial_root_password’] ‘设置,它是在数据库第一次播种(通常是第一次重新配置运行)之前提供的。

# 2。密码没有被手动修改,无论是通过UI还是通过命令行。

#如果这里显示的密码不起作用,您必须在https://docs.gitlab.com/ee/security/reset_user_password.html#reset-your-root-password后重置管理员密码。

密码:XyQdnmCOPZfI + XutyMa40QPecLrKAQ1a456S8 =

#注意:此文件将在24小时后的第一次重新配置运行中自动删除。

centos7下面安装tigervnc-server,客户端vncview

centos7下面安装vnc
centos7改动还是很大的,我们不用x11vnc,使用tigervnc-server包
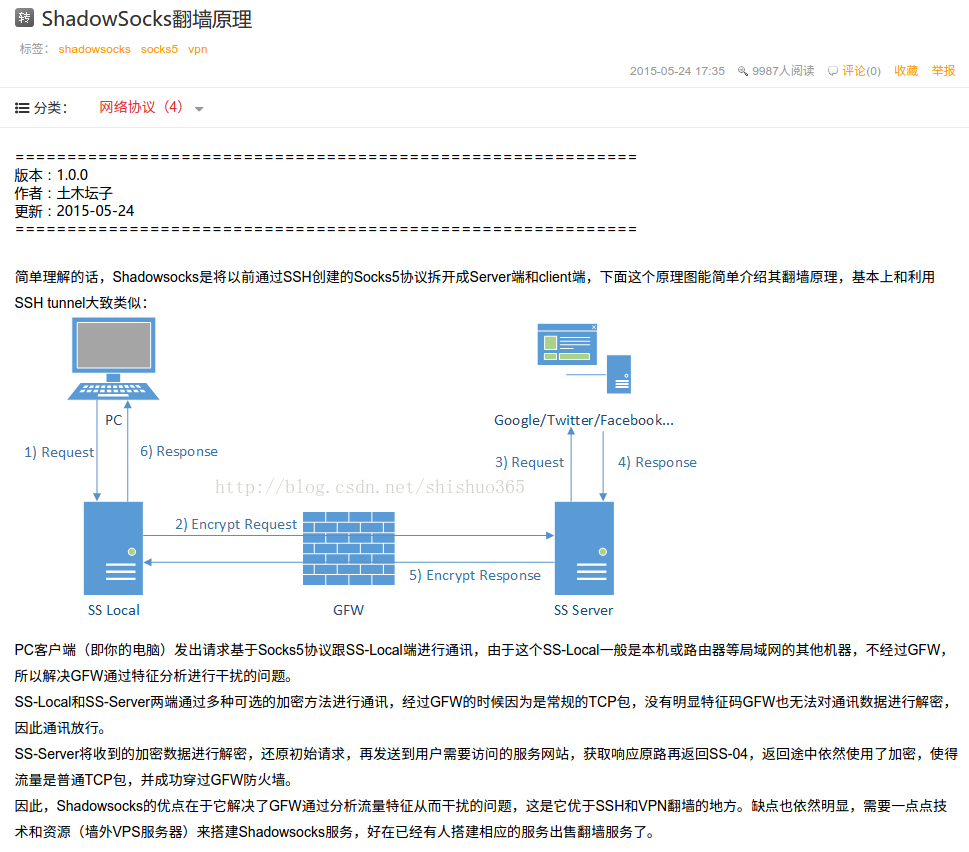
原因是x11vnc听说性能差写,安全性高,tigervnc-server性能好,我的需求就是翻墙,所以用了tigervnc-server

centos方面配置:
yum groupinstall “GNOME Desktop” -y
yum install tigervnc-server -y

mv /etc/systemd/system/default.target /etc/systemd/system/default.target_backup
ln -s /lib/systemd/system/graphical.target /etc/systemd/system/default.target

cp /lib/systemd/system/vncserver@.service /etc/systemd/system/vncserver@:1.service
#编辑vncserver@:1.service

[Unit]
Description=Remote desktop service (VNC)
After=syslog.target network.target

[Service]
Type=forking
# Clean any existing files in /tmp/.X11-unix environment
ExecStartPre=/bin/sh -c ‘/usr/bin/vncserver -kill %i > /dev/null 2>&1 || :’
ExecStart=/usr/sbin/runuser -l jjger -c “/usr/bin/vncserver %i”
PIDFile=/home/jjger/.vnc/%H%i.pid
ExecStop=/bin/sh -c ‘/usr/bin/vncserver -kill %i > /dev/null 2>&1 || :’

[Install]
WantedBy=multi-user.target

useradd jjger
passwd jjger
vncpasswd jjger #设定vpc的密码
#启动:
systemctl daemon-reload
systemctl start vncserver@:1.service
systemctl status vncserver@:1.service

注意:使用以上命令启动vncserver会出错,启动不起来,把type更改为simple就额可以了
这样就不会出错了

客户端连接
apt-get install vncview -y
vncview启动
地址写:xxx.xxx.xxx.xxx:1

over!!!

vnc xauth: (stdin):1: bad display name ,域名解析问题

vnc xauth: (stdin):1: bad display name

1.[root@host144 ~]# /etc/init.d/vncserver restart
2. Shutting down VNC server: 1:root 2:oracle [ OK ]
3. Starting VNC server: 1:root xauth: (stdin):1: bad display name “host144:1” in “add” command
4.

5. New ‘host144:1 (root)’ desktop is host144:1
6.

7. Starting applications specified in /root/.vnc/xstartup
8. Log file is /root/.vnc/host144:1.log
9.

10. 2:oracle xauth: (stdin):1: bad display name “host144:2” in “add” command
11.

12. New ‘host144:2 (oracle)’ desktop is host144:2
13.

14. Starting applications specified in /home/oracle/.vnc/xstartup
15. Log file is /home/oracle/.vnc/host144:2.log
16.

17. [ OK ]
解决方法:

1.[root@host144 .vnc]# cat /etc/hosts
2. 127.0.0.1 host144 localhost.localdomain localhost
3. 10.0.127.144 host144

本人提供服务器技术维护服务,需要者联系

libxml2-2.6.23编译,make时错误

Gentoo上编译libxml2-2.6.23上出错,解决办法如下,gcc太新的问题

/usr/include/bits/fcntl2.h:51: 错误: 调用‘__open_missing_mode’,声明有错误属性:open with O_CREAT in second argument needs 3 arguments

网上查了一下,说是gcc-4.3对语法检查严格的结果,找到出错的那一句,在我编译的程序里是这句
int fd = open(fn.c_str(), O_WRONLY | O_CREAT | O_TRUNC);
将之改为
int fd = open(fn.c_str(), O_WRONLY | O_CREAT | O_TRUNC, 0777);
就OK了

nginx反向代理未备案网站时碰到的问题总结

关于未备案,通过nginx反向代理访问网站的问题
域名:www.hardwork.cn
idc提供:vhost1000.idc.com二级域名可以访问网站,其它任何端口,使用域名www.hardwork.cn无法访问到网站,均提示,未备案

解决:
1、nginx反向代理配置,容易
如proxy_pass http://vhost1000.idc.com即可

2、问题:页面中的连接全部变成了类似于:http://vhost1000.idc.com/img/logo.gif,虽然通过www.hardwork.cn能访问到页面
解决,使用nginx的sub_filter模块来替换页面上的vhost1000.idc.com二级域名为www.hardwork.cn
如下:
继续阅读